
Pool Tile Popping Off at the Waterline? The Real Cause
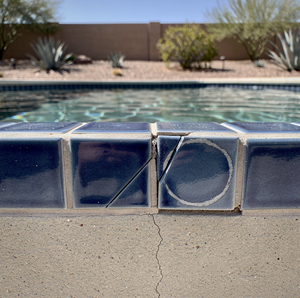
A tile that pops loose at the waterline usually gets blamed on age. You notice one piece sitting crooked, another with a hairline crack through the glaze, and it is easy to write off your pool as simply old. That story skips what is failing behind the tile you can see, a few millimeters from where your fingers touch the edge.
Waterline tile fails because of a bond, not a birthday. Under every ceramic or glass piece sits a thin layer of setting material gluing it to your pool's shell, and that layer responds to movement and water long before the tile itself wears out. Once you know where a bond like that gives way, a crack near your waterline no longer looks random to you.
What Holds Waterline Tile in Place
A waterline tile stays put because of three layers working as one unit, not because the tile is heavy or the pool is old. The tile itself is the layer you touch. Behind it sits a thin coat of thin-set mortar, the adhesive that grips the tile's back and cures into a hard bond. Behind that sits the substrate: the bond beam on a concrete or gunite pool, or the shell itself on a fiberglass one.
On a fiberglass pool, the tile is meant to move with that shell, not fight it, since the whole surface flexes as one continuous piece under water and sun. Each layer only holds if the one beneath it holds, too, so a bond line that looks fine on the surface can already be failing where you cannot see it, between the thin-set and whatever it grips. A pool built with concrete or gunite gives that substrate little flex of its own, so most of the movement ends up in the thin-set or in a joint built for it. You will not see any of this from the pool deck.
What Pops a Tile Loose at the Waterline?
Every pool moves more than it looks like it does. Water and air temperatures swing through the day, and both the shell and the tile expand and contract with those swings at slightly different rates. Without room to flex, pressure builds behind the tile line and pushes out the most fragile piece in the assembly, the tile itself. The deck also pushes against the shell as it heats, loading the same band from a second direction.
A movement joint is the detail meant to absorb that motion rather than pass it straight into the bond: a flexible strip set between the tile and the coping or deck, and at any point where the tile meets a different material. Industry guidance calls for a joint wherever glass tile meets decking or coping. Other experts have doubted that a missing joint is always the main problem, noting that some people believe submerged tile stays stable because water temperature is unlikely to swing far.
You can read both sides for what they are: one names a joint as a leading cause, the other treats it as one variable among several. Either way, a joint that is missing, painted over, or packed solid with grout has lost its only job. That same joint sits at the line where coping meets the tile band, though which coping profile is chosen is a separate decision.
How Water Gets Behind the Tile Band
Movement opens the door; water is what gets through it. A hairline crack in the grout between two pieces lets water sit against the thin-set edge instead of running off, and a joint that has lost its sealant does the same thing. Once water reaches the thin-set, it works against the bond from behind, dissolving and softening the adhesive itself. Grout is a joint filler, not a waterproofing layer, and acidic pool water can pull minerals from grout and weaken thin-set, a chemistry problem the pool's routine upkeep controls, not the tile.
That is a slow process most of the time, and you may not notice it for months. It is also why a tile can look sound from the front right up until the day it does not: the front face tells you almost nothing about what the water has already done to the layer nobody can see.
What Pops Off First, and Which Bond Failed?
A bond is really three separate connections stacked on top of each other, and a failure can start at any one of them. The tile can let go of the thin-set behind it, as when the mortar skins over in heat or wind before the tile is pressed in. The thin-set can let go of the substrate it was troweled onto. Or the thin-set, the tile, or the substrate can fail within itself, a sign that one of those three layers was itself deficient.
That split is the real diagnostic question, ahead of guessing at a single cause for every job. Before naming heat, water, or a missing joint as the reason, an installer checks which of the three connections actually gave way, because a wrong thin-set, a skinned-over mortar, or bad substrate prep all point to different fixes.
None of that changes what you need to do first. It changes what the pool tile installer looks at once the tile is off the wall, and why two pools with the same symptom, tile popping off at the waterline, can have two different repairs waiting behind the same crack. That is also why two installers can land on different repairs for the same crack.
What Gets Checked Before a Tile Reset
Before a pool tile installer resets anything, the visit usually starts with a look, not a tool. That means checking which of the three bonds actually let go, whether the pieces around the failure are still sound or already loose to the touch, and whether the movement joint nearest that spot is doing its job or missing entirely. What gets replaced is rarely just the one broken tile; it is whatever band around it is already coming free, even if it has not cracked yet.
Fractured tile edges at the waterline cut hands and feet. Do not chisel or pry cracked tile off the wall; leave that to a pool tile installer.
Before that visit, walk the pool and photograph the damage from a few angles: a close-up of the crack itself, a wider shot showing where it sits relative to the coping and the waterline, and a shot of any nearby tile that looks loose or discolored. A phone full of clear photos, taken while the light is good and before anyone starts removing pieces, gives an installer more in thirty seconds than a description over the phone ever will. You do not need to remove anything to take them.
Frequently Asked Questions
Where do movement joints go around a pool tile band?
Industry guidance for glass mosaic pool tile adds inside corners and any joints in the concrete shell to the tile-to-coping line, and calls for an architect and an engineer to be consulted on joint placement, a step your installer can check for your pool.
What kind of sealant goes in a pool tile movement joint?
A flexible sealant made for submerged use, not rigid grout. Guidance has the joint brought through to your tile's surface and treated with a flexible sealant suitable for submerged applications, in the standard sealant class for that use, which your installer can confirm.
How long does new waterline tile need to cure before the pool is filled?
A minimum of 21 days before your pool holds water, per standard installation guidance, unless your thin-set manufacturer specifies otherwise. That cure time allows the bond to gain strength before you ask it to hold up against water and constant wetting.
Why do failing waterline tiles often come off in one long horizontal line?
Because the whole band bonds along one continuous joint. When the deck pushes against your shell as it heats, the stress runs the length of that joint, not one spot, and failed jobs commonly show tiles shearing off in a long horizontal line, piece by piece, on the wall.
Does a cracked grout line always mean the tile bond is failing?
Not by itself. A hairline crack in the grout between two pieces is common wear, and it usually gets filled during routine upkeep. It becomes a bond problem once water tracks past your grout and reaches your setting material, a different signal than a grout line alone shows you.
What does the back of a fallen tile show about why it failed?
Look at the back before you throw it out. A bare back with almost no mortar on it means the tile let go of the thin-set. Thin-set still stuck to the back means the mortar let go of the wall, which points to surface prep. Mortar split through its own middle, with some on each side, points to a deficient layer. Those same three questions apply to any fallen piece, and your installer can read them on yours.
Bring a chipped piece or a clear photo in — matching a weathered waterline color and size takes a side-by-side look at real stock, not a guess from a phone screen. North Valley Stone Supply LLC serves Phoenix, Scottsdale, and Tempe. Call (623) 244-8657.